Insert/Edit Images, UT Tyler
OU Campus Training and Standards
The OU Campus Image Editor allows images to be resized, cropped and rotated directly in OU Campus. An image can be edited and uploaded from the Upload To dialog within the Pages list view of OU Campus. NOTE: It is VERY IMPORTANT that you do not upload images larger than how they will display on the page. Follow instructions below to edit images to the proper size.
Selecting and Uploading an Image
- To add an image to a page, navigate to the section of the page you wish to add the image, log in to OU Campus.
- Place your pointer where you wish the image to display.
- Select the "Insert/Edit Image" button:

- Select: " Browse"
You will be taken into the following path:
/images/users/yourdirectorynamehere
This is where you can upload images to place on your page. - Select the image you wish to add to your page. You can view the thumbnails by selecting
"View Thumbnails" -does not work in Internet Explorer).
NOTE: If you need to edit the image, select the "Edit Image" link.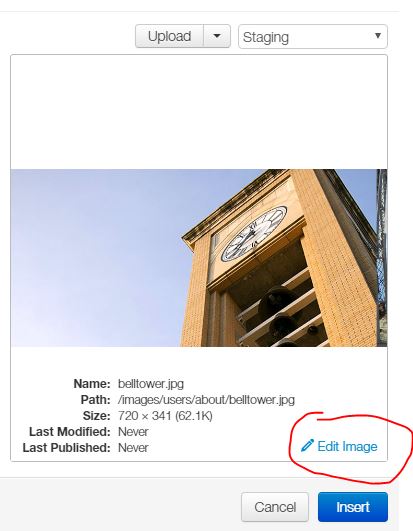
Select "Insert"
- To align an image to the right of the content:
Highlight your image, then select the "Styles" dropdown, then select "Image Align Right".
- Once the page is published, the image will be published to the web server and display
on the page.
Using the OU Campus image editor to crop and resize images will give you the freedom to crop and resize images to the exact file size used on the web page.
NOTE: All faculty pages within your faculty directory should be the same width.
You can also contact the UT Tyler Web Team for assistance with image editing.
For more details, see OU Campus Upload and Edit Image Overview.
- Complete Online Help Files
- Best Practices
- Password Reset
- Gadgets
- Left-Side Navigation
- Logging in / Out
- Writing for the Web
- Complete Downloadable Reference Guides
- Submit a Support Ticket
- Web Publishing Standards, Style Guide and Guidelines